Here's How To Get Your Bookmarks Out Of Twitter And Actually Use Them
I’m going to show you how I get my bookmarks out of Twitter so I can review them at my own pace.
If you’re like me you love collecting bookmarks.
You find a thread that has some useful tips, so you bookmark it. You find a tweet with a cool graphic or a link you want to save and look at later, so you bookmark it.
Eventually, you end up with a treasure trove of information but it sits there because you never remember to look through your bookmarks list.
Bookmarks are hard to manage on Twitter
Let’s face it, the current UI for bookmarks is pretty simple and has remained unchanged for several years now.
You can’t group, sort, organize, or filter your bookmarks in any way.
This adds friction to processing your bookmarks and from getting value out of them.
Let’s face it, this is why you capture bookmarks in the first place right? To get something out of them. Whether it’s design inspiration, an idea for a YouTube video, or something cool you want to share with others.
If you’re like me, you’ll go through each bookmark one by one and think hhmm this is useful I better keep it here until I need it.
Then when you actually do need it, you forget it exists because it’s tucked away at the bottom of your bookmarks list never to be resurfaced.
The solution to this is to get your bookmarks out of Twitter and into a system you can group, sort, organize, and filter.
Here’s the step-by-step system:
Step 1: Categorize what you want to do with your bookmarks
There’s no point saving bookmarks if you don’t know what to do with them.
Write down a list of potential categories for your bookmarks. You can use your current bookmarks list to help you.
Here are some of the categories I use:
- Things I want to read, watch, or listen to
- Design inspiration
- Cool design stuff for my weekly thread
- Recipes I want to try
This alone was a powerful mindset shift for me and made me more decisive when capturing bookmarks. It forced me to only capture things that would be useful for me. It also filtered out stuff that wasn’t worth bookmarking because it didn’t fit into any of my categories.
With a list of categories defined you can put the rest of the process into action.
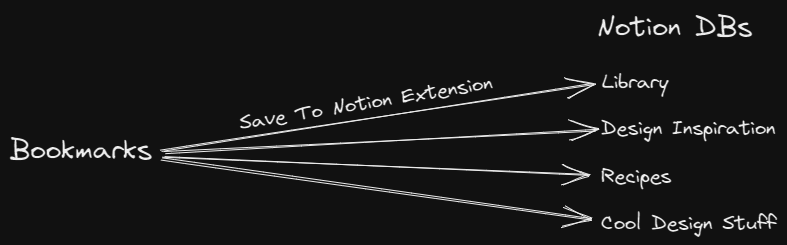
Step 2: Setup Notion Databases to match those categories
In Notion, create separate databases for each of the categories you have defined.
In my case, I have the following databases:
- Library
- Design Inspiration
- Cool Design Stuff
- Recipes DB
Next, within each database, set up the relevant fields you need.
My Recipes DB has the following fields:
- Name
- Category (Baking, Dinner, Lunch, etc.)
- Serves
- Source URL
- Tags
- I’ve Tried This (Checkbox)
As you can see, separate databases give you more flexibility with the fields you can use for each type of content.
Each of these databases acts like a funnel allowing you to move everything from Twitter into a more organized space in Notion.
Once in Notion, you can look through and process these items whenever you like. You can sort, filter, view, and categorize to your heart’s content and actually make use of the ideas contained inside each bookmark.
But we can’t get there unless the process of migrating bookmarks is easy, so let’s look at the magic way to set this up in the next step.
Step 3: Install and setup the Save To Notion app browser extension
The SaveToNotionApp browser extension is what pulls this whole process together.
It makes the act of capturing and organizing your bookmarks so simple and straightforward. And because you’ve taken the time to categorize and create endpoints for your content (i.e. the Notion databases), the process couldn’t be easier.
Install the browser extension and for each category/Notion database, create a new form.
This process in the extension is pretty straightforward and you can tailor what you capture to link in with the fields you created in each Notion database.
Here’s what my Cool Design Stuff form looks like:
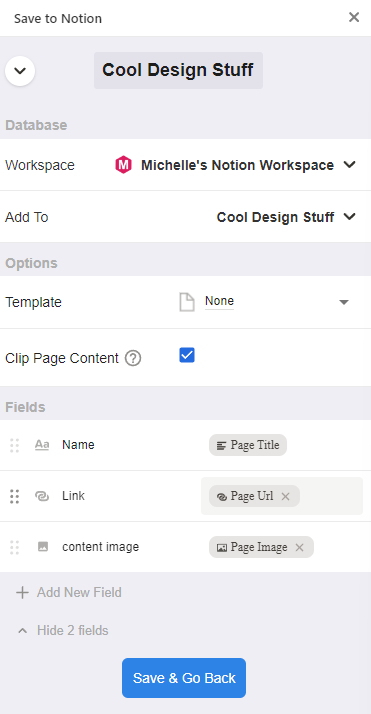
As you can see I’ve defined what database to save to, it also captures the page title and URL into existing fields in my Notion database so I don’t have to manually capture them.
Now when I see a bookmark I want to add to my Cool Design Stuff DB, I click the Save To Notion browser icon and select Add New Page.
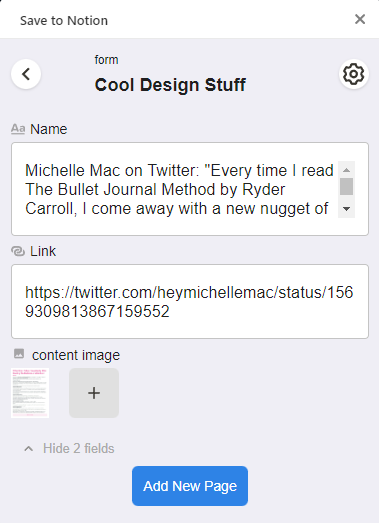
That’s it, job done. I can then delete the bookmark because I know it’s saved in Notion.
Step 4: Process your bookmarks according to your categories
Once you’ve set up each form in the Save To Notion browser extension, it’s time to start processing your bookmarks.
If you’re like me, this will be the really fun and magical part of the process as you decide where each bookmark should go and move it there with the click of a button.
Here’s the workflow:
- Step through each bookmark and hit the Save To Notion browser extension.
- Pick a suitable place to capture each bookmark to and fill in the relevant fields if needed.
- Hit save. You can open the page in Notion immediately after you’ve captured it. This is a good way to sanity check things have been captured correctly at least for the first few items.
- Delete the bookmark from your Twitter bookmarks list.
- Repeat
I like to do this clear-out once a week before or after my weekly review as it gives me a chance to clear everything up and have a fresh start next week.
A useful feature of this extension is if you’ve already saved the same page recently it will let you know. This is a great way to prevent duplicate entries from appearing in your databases.
Step 5: Process your Notion databases
The magic is done and now you have a collection of Notion databases bursting with ideas and knowledge just waiting to be utilized.
The great part about this process is you don’t have to work through each database immediately or at all. You can let this data sit there until you need to or want to process it.
For example, I only look at my Cool Design Stuff DB once a week when it’s time to schedule my cool design stuff thread on Twitter.
Apart from that it just sits there, but I know I’m adding great content to it regularly so I have peace of mind that it’ll be helpful for me when I need it.
TL;DR
- Step 1: Categorize what you want to do with your bookmarks
- Step 2: Setup Notion Databases to match those categories
- Step 3: Install and setup the Save To Notion app browser extension
- Step 4: Process your bookmarks according to your categories
- Step 5: Process your Notion databases