My Writing Workflow For Content Creation
I recently revised my content creation workflow to tie in better with my goal to develop a consistent writing habit. With that in mind, I thought this would be the perfect opportunity to share with you my simplified writing workflow for content creation.
This is how I operate each weekday to create content to share with you on this blog.
My Content Creation Buckets
If you’ve read my previous post on how batching tasks can increase your productivity, you’ll know that I operate my content creation by batching or chunking my work into defined groupings of tasks.
By doing this I could work on the same type of task across multiple articles rather than focusing on one article at a time and going step by step through the creation process.
In the current incarnation of this workflow, I further refined these chunks of work aka buckets based on reading a great article from Curtis McHale where he shares the three buckets that make up his writing process.
Each day, you simply take one item from each bucket and do the work needed to move it to the next bucket.
I really like this approach.
It doesn’t overcomplicate things and ensures that you’re working on small enough chunks that you can feasibly do without becoming mentally overloaded.
My content creation buckets are as follows:
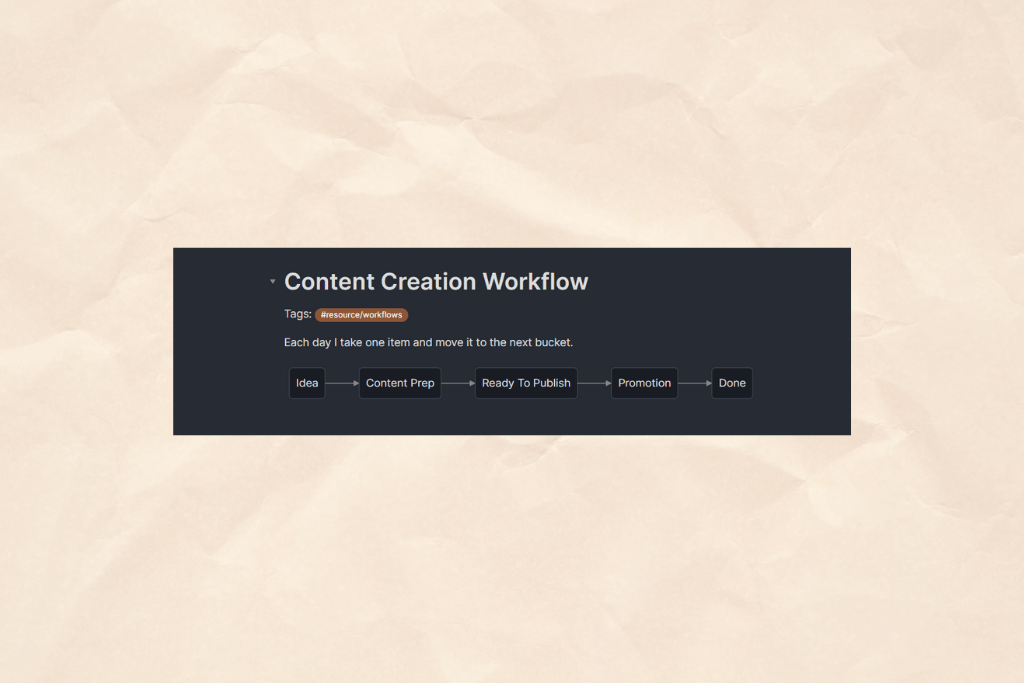
Ideas
The Ideas bucket contains ideas for articles I want to write.
I usually get inspiration for this from the articles and the books that I read each day.
I could equally come up with 2 or 3 ideas when I’m out walking the dog or driving to the shop.
With that in mind, I add all of my ideas into a list in Todoist called Writing Topics.
I try and add enough detail to the idea so I’ll remember what to write about when I pick it from the list.
Content Prep
Each day, I pick one item from my Ideas bucket and write about it.
This is where my writing habit goal that I’ve set for myself comes in to play.
I set between one and two Pomodoro timers for my writing time. Each Pomodoro is 25 minutes, so I write for 25 minutes, take a 5-minute break, then write for another 25 minutes.
I have found that this gives me the motivation to actually start writing which is usually the main source of friction for me with doing work.
The other one being the fear of the blank page which I’ve somewhat overcome due to my reading & note taking process.
Once actually start writing, I can easily make my way through a Pomodoro and I’m motivated to keep working until I’ve finished writing.
In terms of what I’m writing and how I create an outline of the content, I have found that using a tool like Obsidian to be most helpful when combined with the strategy of Literature & Evergreen notes.
This concept is at the core of the book How To Take Smart Notes by Sönke Ahrens which I’m sure you’ve seen me reference a lot in my articles.
Since I started using Obsidian to store my Literature and Evergreen notes, I’ve found the writing process so much easier.
That’s because I’ve already synthesized so many ideas and connections that I can pick from and expand upon to generate more ideas.
I have found that I don’t need to do nearly as much research as I did previously on a topic because I already have all of the information I need in my Personal Knowledge Management (PKM) system.
Ready To Publish
Once I’ve written an article, I then take an existing article that I’ve written previously and get it ready to be published on my blog.
My first step here is to re-read the article to make sure the article makes sense and provides some valuable information.
I’ll also check the spelling and grammar using the free version of Grammarly.
After that is done, I create a cover image and a Pinterest pin in Canva.
Then it’s just a matter of adding the article into WordPress and hitting publish.
With that said, I don’t post an article every day. Right now it’s about 2-3 times a week.
I usually prefer to build up a backlog of articles so I always have some content ready to go should I need it.
Promotion
Once an article has been published on my blog, it’s status moves to Promotion.
Here, I create a set of 10 pins for the article to schedule on Pinterest, Instagram, and Twitter.
I have been following this approach in the past on some other blogs which has been pretty successful but am still not fully on board with doing it for this blog as I’m not sure how engaging this content would be on Pinterest especially.
I’ll continue to try it out for now and see if it provides any engagement or value to people on social media.
Done
Once the article is published and it has had social media pins created, then it is classed as done.
I like to keep a list of these articles so I can refer back to them when I want to check what I’ve already written about.
I also like keeping track of how many articles I’ve published. This is honestly more of a vanity metric but I do find it pretty motivating to look at.
Conclusion
I hope this insight into my writing workflow for content creation has been of some value to you.
Feel free to try this approach out for yourself if you are struggling to write and publish content consistently.
If you did find some value in reading this article, please consider sharing it on social media. It will help others to find it and that would really help me out.